Games
The list of games installed on the console. From here you launch a game, see what is installed (base game, updates, DLC), move it between the console's internal memory (NAND) and the microSD card, export it as NSP files and delete it.
Where: Tools → Game Tools → Games
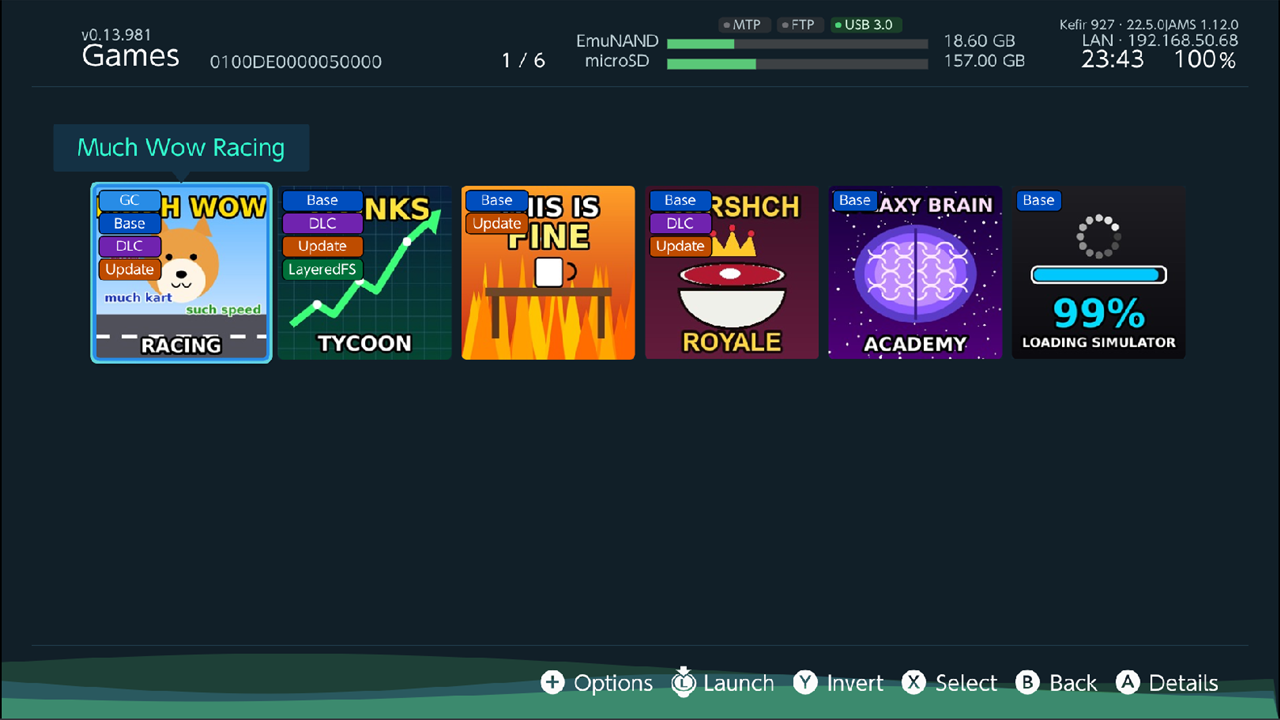
Read the list
Each game shows small badges:
| Badge | Meaning |
|---|---|
| SD / NAND | Where the game's content is stored: microSD card or internal memory. A game split between both shows both. |
| GC | Part of the game is on the inserted game card. |
| Base, Update, DLC | Which parts are installed. |
| LayeredFS | The game's mods folder has files in it, so Atmosphère loads mods for it. |
| - | No base game is installed (only an update or DLC is left). |
Games with no installed content or unreadable data also appear, unless you turn off Show unavailable games (see Options).
Launch a game
- Focus the game.
- Press L3 (press the left stick in).
You can also launch from the details screen: press L3, or press + and choose Launch.
To let the console pick for you, press + and choose Launch random game, then Launch in the dialog.
See a game's details
- Focus the game and press A.
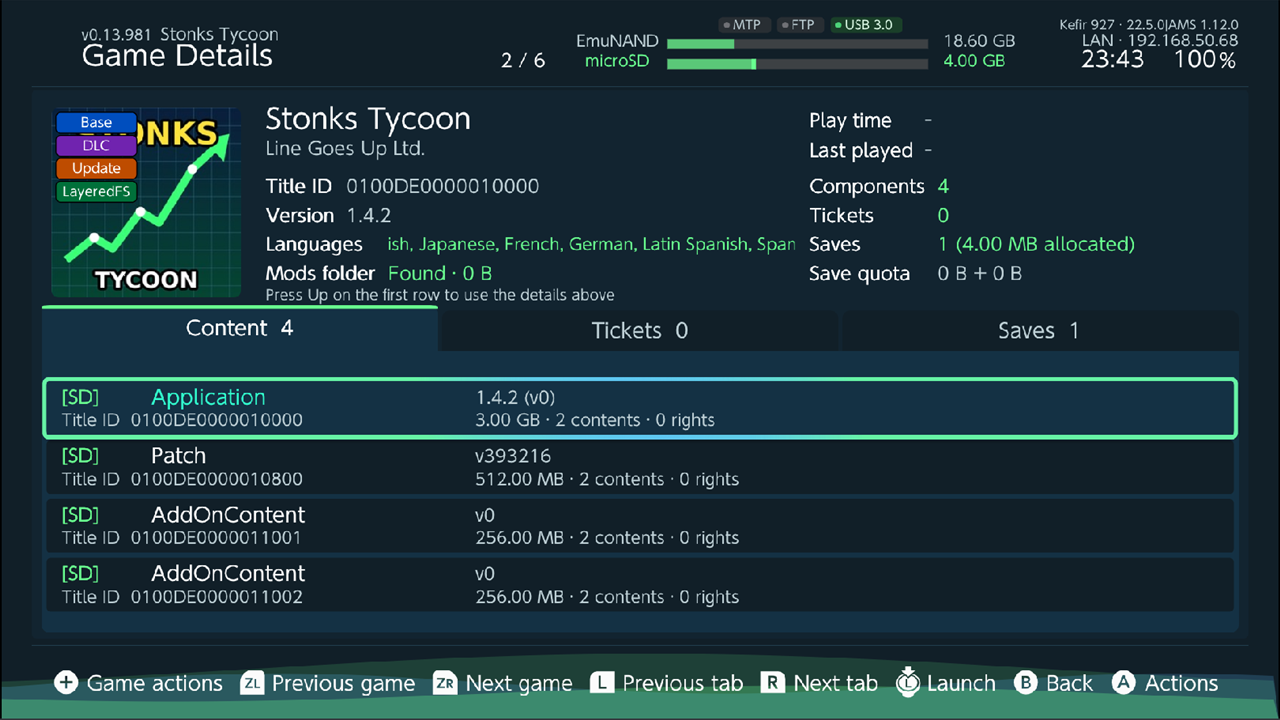
- The Game Details screen opens. The top shows Title ID, Version, Languages, Mods folder, Play time, Last played, and how many Components, Tickets and Saves the game has.
- The bottom has three tabs: Content (base game, updates, DLC), Tickets and Saves. Switch tabs with L and R.
- Press ZL / ZR to go to the previous or next game without leaving the screen.
- To use the items at the top (for example the language list or the mods folder), press Up on the first row of the tab, then A.
What A does on a tab row:
- Content row: opens Component Actions — Open in file browser (browse the component's files, read-only), Dump NSP (export only this component), Move component to SD or Move component to NAND, Content information.
- Tickets row: shows the rights ID, key generation and ticket type.
- Saves row: opens Save Actions — see Manage save slots.
Select several games
- Press X to select or unselect the focused game.
- Press Y to invert the selection.
- Press B to clear the selection (press B again to leave).
The actions under SELECTED GAMES in the + menu apply to every selected game. With nothing selected they apply to the focused game.
Move a game between NAND and microSD
Moving copies the content to the other storage, switches the game over to the new copy, and only then deletes the old copy.
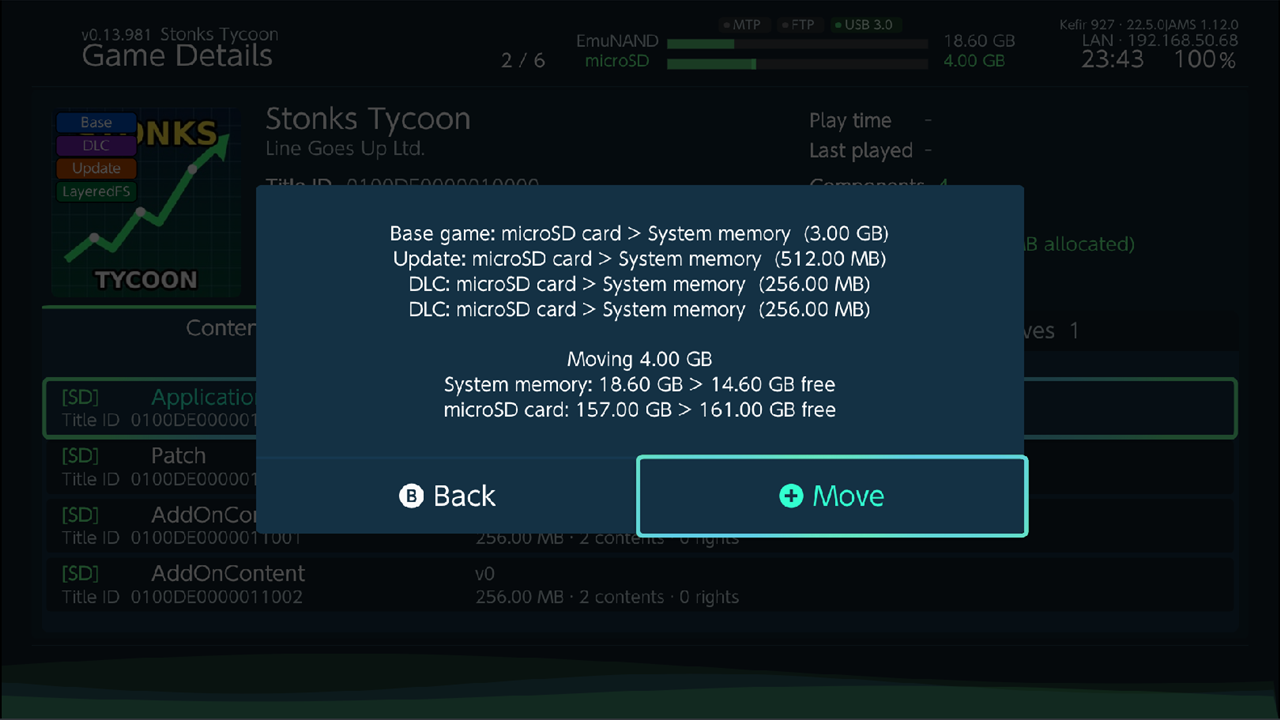
One game, from the details screen: 1. Open the game with A, press +. 2. In Game Actions choose Move to SD or Move to NAND. Only the direction that has something to move is shown. 3. A summary lists each part that moves, each part that stays, the total size, and the free space on both storages before and after. Choose Move.
Several games, from the list: 1. Select the games, press +. 2. Choose Move to SD or Move to NAND. This starts at once, without a summary.
One part only (for example only the DLC): on the Content tab press A on the part and choose Move component to SD or Move component to NAND.
Warning
Moving a whole game is refused before it starts if the target storage does not have enough free space. You can cancel while data is copied; near the end, when the game is switched to the new copy, cancelling is no longer possible. Do not turn the console off during a move.
Export a game as NSP (dump)
- Select the games (or focus one), press + and choose Dump.
- Choose what to export: Dump All, Dump Application (base game), Dump Patch (update), Dump AddOnContent (DLC) or Dump DataPatch. Only the parts that all selected games have are offered.
- In Select dump location choose where to write:
- microSD card (/dumps/) — files go to
/dumps/NSP/on the microSD card. - USB transfer (Switch 2 Switch) — sends to another console over USB.
- /dev/null (Speed Test) — reads the data and throws it away, to test speed.
- Network locations and USB drives you have set up also appear here.
- microSD card (/dumps/) — files go to
From the details screen: press + → Dump all components, or on the Content tab A → Dump NSP for a single part.
Settings for dumps are in + → Advanced options → Dump options (see Dump options).
Create one merged NSP (repack)
A repack puts the base game, its newest update and all DLC into one NSP file.
- Open the game with A, press +, choose Create repack.
- Tick what to include: Application/BASE, Patch/Update, AddOnContent/DLC.
- Choose Create repack at the bottom.
The file is written to /games/ on the microSD card.
Delete a game
- Select the games (or focus one), press +.
- Choose Delete and confirm with Delete. If a selected game has mods, the question also offers Delete with mods: it removes the game's mods too (cheats stay).
This removes the installed base game, updates and DLC and drops the game from the list. Save data is kept — the saves then appear in Saves under Deleted Games. To remove saves too, delete them in Saves.
Game restrictions
Let a game start without a linked Nintendo Account, or allow screenshots and video capture where the game forbids them.
- Open the game's details screen, press + → Restrictions.
- Switch Linked Nintendo Account required, Screenshots allowed or Video capture allowed. Turning video on also allows screenshots.
- The change applies on the next launch.
Warning
This rewrites the game's control data (base game and update), so the console needs sigpatches (Kefir includes sys-patch). Installing the update again brings the original restrictions back; switch them again then.
Force a game's language
Start a game in another language than the console's, for example English for a translation that replaces the English text.
- Open the game's details screen, press + → Force language.
- Pick a language (only the game's own languages are listed) or Off.
- The next launch uses it. Languages on the details screen then shows "Forced: …".
Translation packs that carry a kefir_lang.json file set this automatically when you install them.
The setting is Atmosphère's override_language in /atmosphere/contents/<Title ID>/config.ini.
Mods folder
Atmosphère loads mods for a game from /atmosphere/contents/<Title ID>/ on the microSD card (LayeredFS).
- On the details screen, Mods folder shows Not found, Empty or Found with the size of the mods.
- Press + → Open mods folder to open it in the file browser. If it does not exist the entry is called Create mods folder; confirm with Create.
- From the list, + → Create mods folders creates the folder for every selected game.
- + → Delete mods removes everything in the folder except
cheats/; cheats are managed in Cheats.
An empty folder does nothing; copy the mod's files into it.
Manage save slots
These actions work on the game's save data on the console. To back up or restore saves, use Saves.
On the details screen, Saves tab:
- X or Create save slot: creates an empty save for a user who does not have one yet.
- Pick the user.
- Pick the size: default, +16 MiB or +64 MiB.
- Check the summary and choose Create.
- Increase save size: makes a save slot larger (+16 MiB or +64 MiB). A save cannot be made smaller. Confirm with Increase.
- Save information: shows user, type, size and save ID.
- Backup and restore: opens Saves showing only this game.
From the list, + → Create save creates a default save for all selected games for the user you pick. Games that already have a save for that user are skipped.
Sort, search and filter
Press +:
- Layout: List, Icon, Grid or HB Menu.
- Sort By → Sort: Updated, Alphabetical, Publisher, Storage, Last played, Play time; Order: Descending or Ascending.
- Sort By → Update play time: reads the total play time of every game from the console's play log, then sorts by it. Run it before sorting by Play time.
- Search: type part of a name to show only matching games. Clear search shows all games again.
Options
In + (and + → Advanced options):
| Option | What it does | Default |
|---|---|---|
| Layout | How games are shown. | Icon |
| Sort / Order | Sort field and direction. | Updated, Descending |
| Show unavailable games | Shows games that have no installed content or unreadable data. | On |
| Hide forwarders | Hides forwarder shortcuts. | Off |
| List meta records | One game selected: lists every installed record (type, storage, version). | — |
| Refresh | Rescans the library. | — |
| Title cache | Keeps game names and icons so the list opens faster. | On |
| Delete title cache | Clears the cache; names and icons are read again. | — |
Dump options
+ → Advanced options → Dump options. The XCI options apply to game card dumps (see Game card).
| Option | What it does | Default |
|---|---|---|
| Created nested folder | Puts each dump in a folder named after the game. | On |
| Append folder with .xci | Names that folder with the .xci extension too. |
On |
| Trim XCI | Cuts unused space from the end of an XCI. | Off |
| Label trimmed XCI | Adds "(trimmed)" to the name of a trimmed XCI. | Off |
| Convert to common ticket | Converts a personalised ticket to a common one in the dump. | On |
Problems
Move or Move to SD is missing. The game is already completely on that storage. Only directions with something to move are offered.
Move failed! right after starting. Usually not enough free space on the target. Free space or move a smaller part with Move component to SD / Move component to NAND.
Dump is not in the menu. One of the selected games has no readable installed content. Select only installed games.
No matching installed content to dump. The selected games do not have the part you chose (for example no DLC).
Play statistics are unavailable. The console's play log could not be read; Play time and Last played stay empty.
A deleted game still shows saves. This is intended: Delete keeps save data. Manage it in Saves.