Share files with a PC
Reach the files on the console's microSD card from a PC or phone: in a browser, with an FTP program, or with a USB cable over MTP. Use it to copy screenshots, backups, logs or homebrew without taking the memory card out.
| Way | Connection | On the PC or phone | Section |
|---|---|---|---|
| Browser | Wi-Fi or LAN | Any browser | Open the files in a browser |
| FTP | Wi-Fi or LAN | An FTP program (for example FileZilla or WinSCP) | Connect over FTP |
| MTP | USB cable | The file manager (on Windows: File Explorer) | Connect over MTP |
To install games this way, see Install over the network and Install over MTP. To move data to a second console, see Console Transfer.
Warning
The browser page has no password, and FTP lets anyone in with the default settings. While a server runs, anyone on the same network can read, upload and delete files on the whole microSD card. Use these servers only on your home network, stop the web server when you are done, and set an FTP login (see FTP settings).
Open the files in a browser
Where: Tools → + → Install & Share → Web Server
- Connect the console to Wi-Fi or LAN.
- Open Tools, press + and select Web Server. In Applet Mode, choose Start anyway in the panel that opens first (see Install from a browser).
- The Web Sharing Server window shows a QR code and an address, for example
http://kefir.local. When port 80 is taken, the address has a port from 8080 to 8090, for examplehttp://kefir.local:8080. - Scan the QR code with a phone, or type the address into a browser on a PC on the same network.
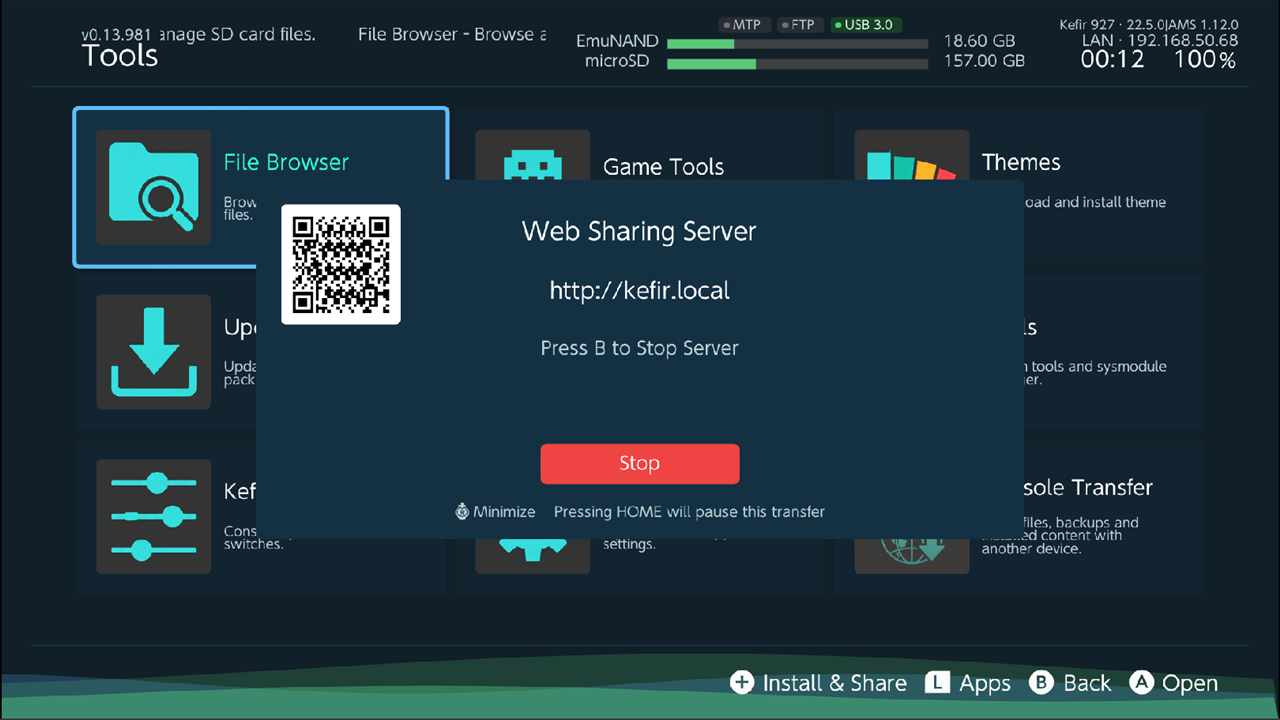
If the address with kefir.local does not open, use the IP address shown at the top of the console screen,
for example http://192.168.1.5 (add :8080 or the port the address had).
What the page can do
The page Kefir Hub Files opens on the microSD card. If one folder is mounted (see Share one folder), it opens on that folder. If USB drives are connected or several folders are mounted, it first lists these sources and sd (the microSD card) to choose from.
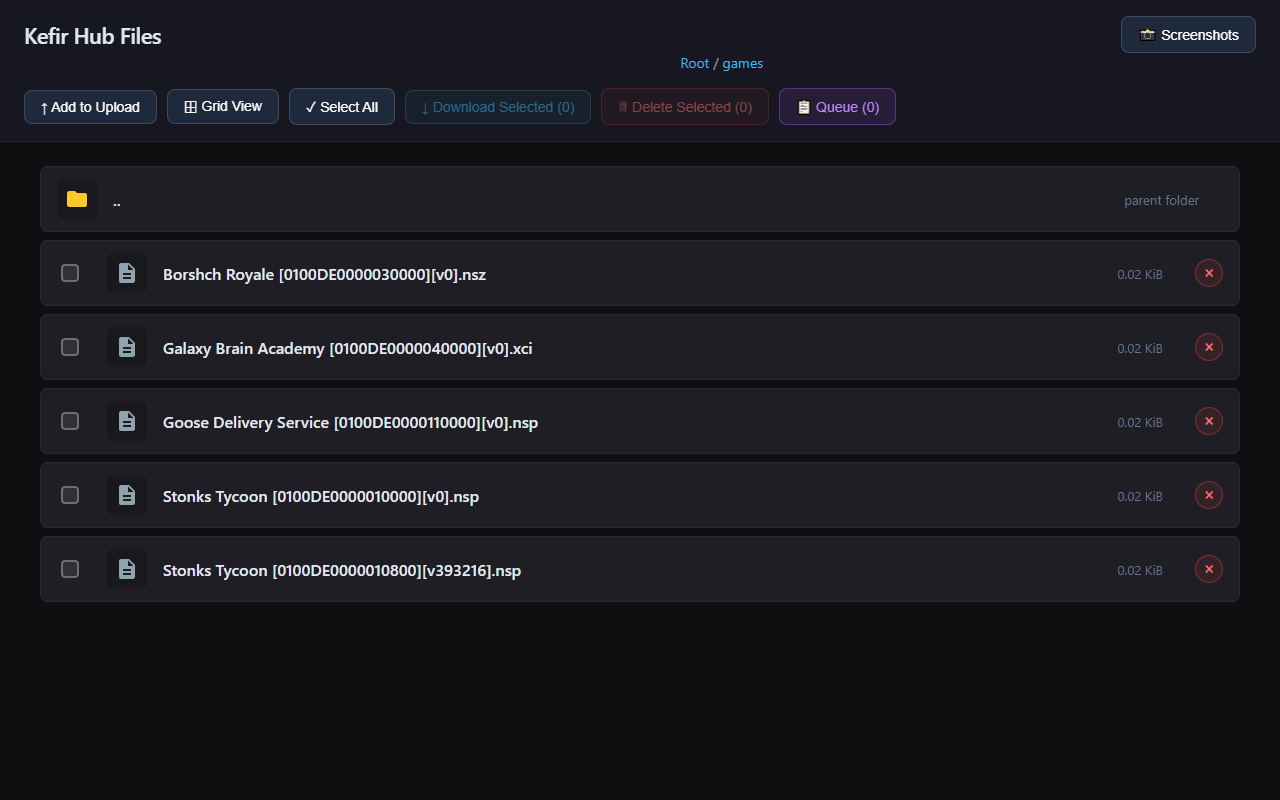
- Click a folder to open it. The path at the top takes you back.
- Click a file to download it. Pictures open in the browser.
- Tick files and folders, or use Select All. Then:
- Download Selected adds them to the queue and downloads them one by one. A folder is downloaded file by file; the browser may ask whether to allow several downloads.
- Delete Selected deletes them after you confirm.
- The × next to an item deletes it after you confirm.
- Grid View / List View switches the layout.
- Add to Upload picks files from the PC; Queue → Start transfers uploads them into the open folder. Game files are installed instead, unless you untick Install directly (see Install from a browser).
- Screenshots opens the album page.
Tip
For a very large file, click its name instead of using Download Selected. Download Selected keeps the whole file in the browser's memory until it is complete.
The page is in English only.
Screenshots and videos
Click Screenshots on the page. The page Kefir Hub Album shows the console's album: /Nintendo/Album on
the microSD card, or the album of the emuMMC you booted.
- All Screenshots lists every picture and video with the game name, title ID, date and size.
- Browse by Date shows the album folders by year, month and day.
- Click a picture to open it full size and save it from the browser. Videos play on the page.
- Delete under an item, or Select All and Delete Selected, removes them from the console.
- File Browser goes back to the file page.
Stop the web server
Press B on the Web Sharing Server window. Press R3 to shrink the window to a badge and keep using Kefir Hub while the server runs; press R3 again to bring it back.
The server also stops by itself when the console goes offline or gets a new IP address (Web server stopped: the console went offline, Web server stopped: the console's IP address changed).
Connect over FTP
The FTP server runs in the background while Kefir Hub is open.
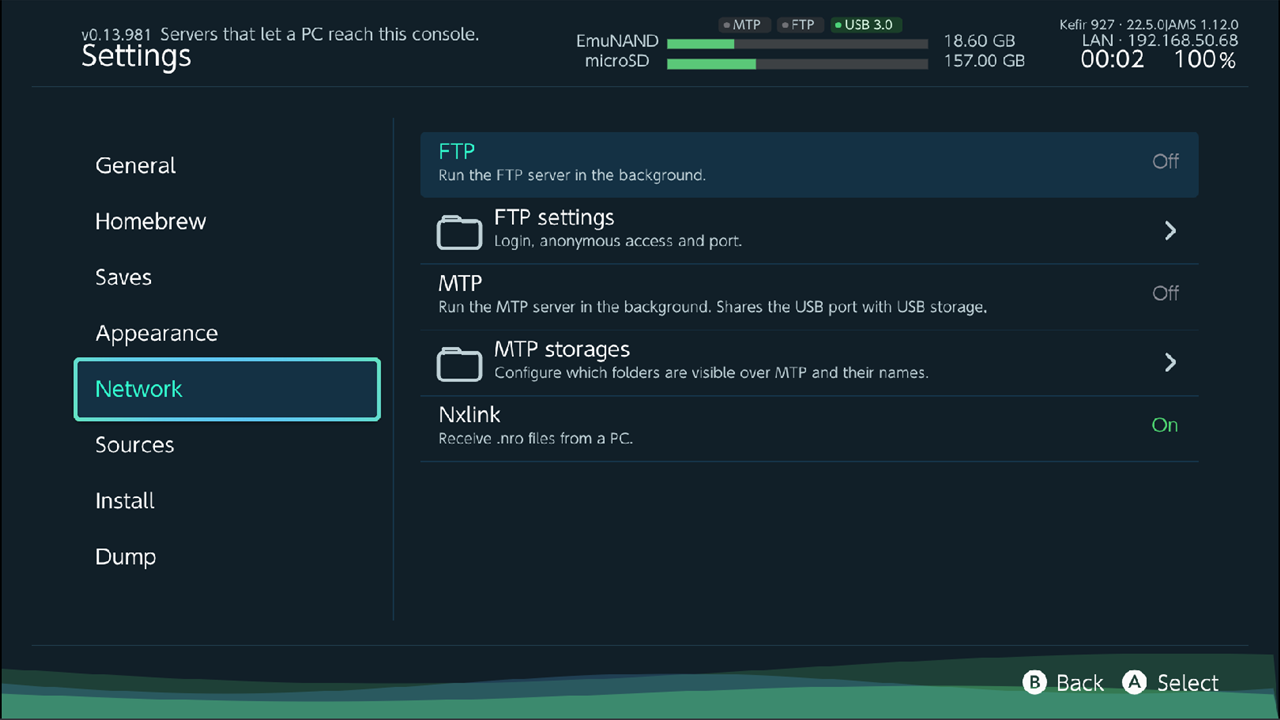
Where: Tools → Settings → Network → FTP
- Turn FTP on. It stays on, and starts with Kefir Hub, until you turn it off.
- Note the console's IP address at the top of the screen.
- In the FTP program, connect to that address on port
5000. With the default settings any user name and password work, also empty ones.
The top level of the server shows:
- the microSD card;
install: game files copied here are installed (see Install over FTP);- the mounted folder, if you mounted one (see Share one folder).
System storage (NAND) is not shown over FTP.
Warning
A game file (.nsp, .nsz, .xci, .xcz) or .nro copied to the top level of the server is installed, not
saved. To store such a file on the microSD card, copy it into a folder.
FTP settings
Where: Tools → Settings → Network → FTP settings
| Option | What it does | Default |
|---|---|---|
| Anonymous (no login) | Lets anyone connect with any user name and password. | On |
| Username | User name the FTP program must use when Anonymous (no login) is off. | Not set |
| Password | Password for that user name. | Not set |
| Port | Port the server listens on, 1–65535. | 5000 |
To require a login, set Username and Password, then turn Anonymous (no login) off. If both are empty, the server still lets anyone in, so you cannot lock yourself out. Each change restarts a running server; connect the FTP program again.
Connect over MTP
With a USB cable the console appears on the PC like a phone or camera. You copy files in the PC's file manager.
Start MTP
- Handheld mode: connect the console to the PC with a USB cable. After about two seconds MTP starts and the console shows Computer connected — MTP started. Unplug the cable to stop it.
- By hand: open Tools, press + and select Mount MTP. You see MTP started and the entry changes to MTP: Active. Select it again to stop (MTP stopped). Connect the cable first; without it you see Failed to start MTP.
- Always on: turn on Tools → Settings → Network → MTP.
MTP and USB storage (USB drives connected to the console) use the same USB port. Turning MTP on turns USB storage off, and the console shows USB storage turned off to free the USB port.
Drives the PC sees
| Drive | What it holds | Shown by default |
|---|---|---|
microSD card |
The whole microSD card, read and write. | Yes |
Install (NSP, XCI, NSZ, XCZ) |
Game files copied here are installed. See Install over MTP. | Yes |
Saves |
Game saves, unpacked. Read-only: copy them to the PC. | No |
NAND Saves (USER:/save) |
The raw save files of games in system memory, read and write. | No |
NAND System Saves (SYSTEM:/save) |
The raw save files of the system, read and write. | No |
Games (read-only) |
Installed games, updates and DLC as NSP files. Copying one to the PC makes a dump of it. Nothing is written to the microSD card. | No |
| A folder you added | That folder of the microSD card as its own drive. | — |
| A mounted folder | The folder you mounted from the File Browser (see Share one folder). | — |
Warning
The two NAND drives give direct write access to save data in system memory. A wrong file copied there can break a game's saves or the system. Back up saves first (see Saves) and leave these drives off unless you know you need them.
MTP storages
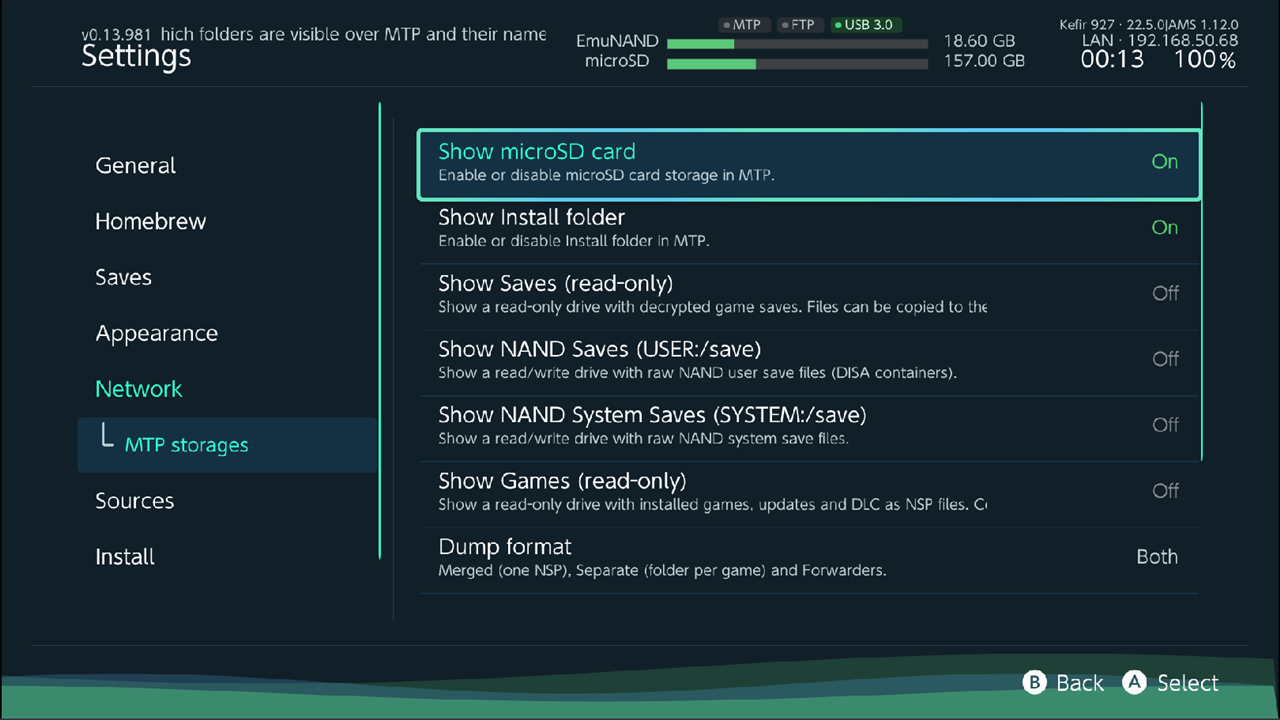
Where: Tools → Settings → Network → MTP storages
| Option | What it does | Default |
|---|---|---|
| Show microSD card | Shows the microSD card drive. | On |
| Show Install folder | Shows the install drive. | On |
| Show Saves (read-only) | Shows the unpacked saves drive. | On |
| Show NAND Saves (USER:/save) | Shows the raw game saves drive. | Off |
| Show NAND System Saves (SYSTEM:/save) | Shows the raw system saves drive. | Off |
| Show Games (read-only) | Shows the installed games drive. | On |
| Dump format | How the games drive lists games, see below. | Both |
| microSD card name | Your own name for the microSD card drive. | microSD card |
| Install folder name | Your own name for the install drive. | Install (NSP, XCI, NSZ, XCZ) |
| Add folder | Pick a folder on the microSD card; it becomes its own drive. | |
| each added folder | Select it and choose Remove at Remove this folder from MTP? to remove it. |
A change restarts a running MTP connection. If every drive is off, MTP does not start and you see No MTP storages enabled.
Dump format values:
| Value | What the games drive shows |
|---|---|
| Compatible dump | One NSP per game with base game, update and DLC together. |
| Separate files | A folder per game, with the base game, update and each DLC as separate NSP files. |
| Both | Three folders: Merged (as Compatible dump), Separate (as Separate files) and Forwarders (HOME Menu forwarders). |
With Separate files or Both, each game folder also has a Mods folder. It is the game's
/atmosphere/contents/<Title ID>/ folder on the microSD card (mods and cheats): copy mods into it or out of it, rename
or delete them, like on the SD card drive. The NSP files next to it stay read-only.
Share one folder
You can share one folder of the microSD card on its own. It then shows up as an extra drive over MTP, as an extra folder at the top of the FTP server, and as the start page of the web server.
Where: Tools → File Browser → + → Mount
- In the File Browser, highlight the folder (or select several with X). With nothing highlighted, the open folder is used.
- Press + and select Mount.
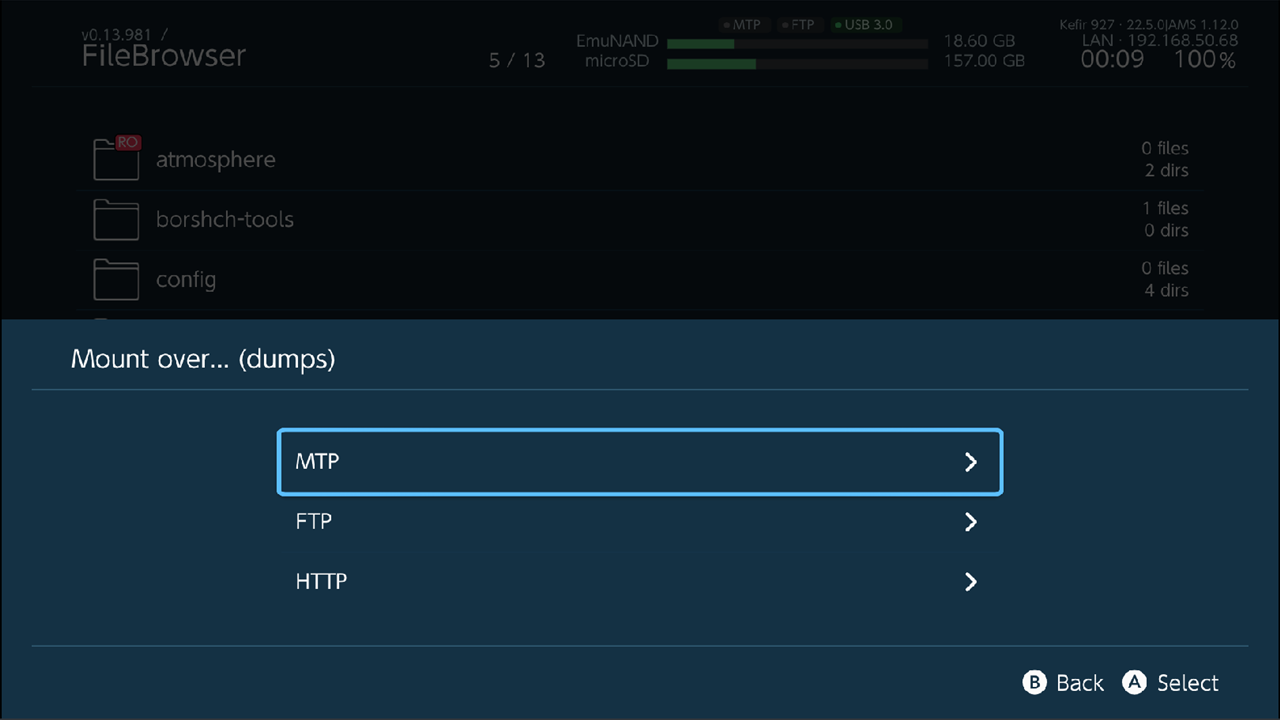
- The Mount over... list names the folder and offers:
- MTP: the folder appears as its own drive on the PC.
- FTP: turns the FTP server on if it is off. The folder appears at the top level of the server. The
console shows the FTP address, for example
ftp://192.168.1.5:5000 (games). - HTTP: starts the web server. Its page opens on that folder.
A way that already serves a folder shows its name, for example MTP: games.
There is one mounted folder for all three ways: mounting it over one shows it on the others too. To stop, press + in the File Browser and select Unmount. The mount is also forgotten when Kefir Hub closes.
Over MTP you can also mount a game's content or a ZIP archive opened in the File Browser. FTP and the web server can only share folders of the microSD card (Only microSD folders can be shared over FTP).
Warning
Mounting does not hide the rest of the card. The web page and the FTP server still reach every folder on the microSD card.
The File Browser also has Advanced → Start Web Server, which starts the web server on the open folder.
Send homebrew with nxlink
For homebrew developers: the nxlink tool from devkitPro sends a .nro from a PC to the console and starts it.
Where: Tools → Settings → Network → Nxlink (on by default)
- Keep Kefir Hub open on the console.
- On the PC, run
nxlinkwith the.nrofile. Use-aand the console's IP address if it does not find the console. - The console shows Nxlink Connected, Nxlink Upload and Nxlink Finished. The file is saved to
/switch/and started.
Anyone on your network can send and start an app this way. Turn Nxlink off if you do not use it.
Problems
Web Server is grey. The console has no network connection. Press it anyway: Kefir Hub says The console has no internet connection. and offers to connect.
The browser cannot open kefir.local. Some phones and PCs do not find .local names. Type the IP address from
the top of the console screen instead, with the port if the address had one.
The page does not open at all. The PC or phone is on another network, or on a guest Wi-Fi that keeps devices apart. Connect both to the same home network. If Kefir Hub showed Web listener started, but its local self-test failed; check the log or use Title Mode, start Kefir Hub in Title Mode and try again.
The page stopped working. The server stopped because the console went to sleep, lost Wi-Fi or got a new IP address. Start Web Server again and use the new address.
The FTP program cannot connect. Check that FTP is on, that you use the console's current IP address and the
port from FTP settings (5000 by default), and that both devices are on the same network.
The FTP login is refused. Anonymous (no login) is off. Use the Username and Password from FTP settings, or turn Anonymous (no login) on.
The PC does not show the console over MTP. MTP starts by itself only in handheld mode. Start it with Mount MTP after you connect the cable. Use a cable that carries data, not only power.
No MTP storages enabled Turn on at least one drive in MTP storages.
A USB drive disappeared when MTP started. MTP and USB drives share the port. Turn MTP off to use the drive again.
The FTP program was disconnected. Changing FTP settings or mounting a folder over FTP restarts the server. Connect again.